Saturday, August 10, 2013

Soundproofing your boat


  Soundproofing a boat can be a relatively simple project if you are willing to follow a few careful steps. If your water craft has a stern forward in board engine, then what you need to look at are the engine hatch and the hull walls and spars.
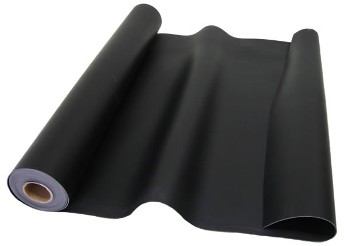
  The premiere product used for boat soundproofing is what we call America Mat closed cell foam. America mat is PVC-NBR foam that acts as both a blocking agent as well as an absorber. This combination is exactly what you want to soundproof your boat.
Your first priority is to treat the underside of the engine hatch by adhering the America mat to the underneath surface of the hatch. The best thickness for this application is the 1” thick America mat. America Mat is a flat black smooth surfaced foam that will be glued to the underside of the hatch. You can use any type of waterproof adhesive, but we recommend the 3-M77 or 3-M80 spray contact cements. The first step for installing the America Mat is to cut it to fit perfectly into the cavity on the underside of the engine hatch. When cutting the America mat we strongly suggest using a electric meat cutting knife, you know the kind your mother used back in the 1970’s and 80’s. These electric knives will cut the foam leaving a nice factory smooth edge and the knife can also make it easy to bevel or radius the edge of the foam to make the installation look professional. The America mat has been used extensively in Custom automobiles such as Ferrari’s and Lamborghini’s so you know it looks professional.
Once the America mat foam is cut to fit, you may want to tale san paper and rough up the underside of the engine hatch. Once you have scuffed the surface, it is time to apply the adhesive. First you will spray the underside of the hatch as stated on the can and also spray the   side of the foam that will be glued down. Let both pieces set apart as long as the can states and then carefully adhere the 2 pieces together and press firmly. I recommend that you allow the adhesive to cure over night before replacing the hatch back over the engine compartment.
 Just this simply project will help to dramatically reduce the noise that would normally be transmitter to the deck surface. It is a good idea to adhere the America mat foam to the inside surface of the boat hull especially if the engine compartment does not have a wet bilge.
This step is imperative if you have living quarters below deck. Treating the bulkheads with the 1” America mat can mean the difference between a restful night’s sleep and a night of tossing and turning.
To learn more about soundproofing your boat, call one of the Pros at Soundproofing America, Inc. You’ll be glad you did. This is Dr. Bob, Adios!

Friday, August 9, 2013

Soundproofing with Mass Loaded Vinyl


  I have written a lot of articles on Mass loaded Vinyl because it is a very 
versatile and effective soundproofing agent. Mass Loaded Vinyl or (MLV for short)
 is a high grade vinyl that is impregnated with Barium salts and silica
(sand) to give it the consistency and the mass of lead sheeting, however MLV contains absolutely no lead at all.
 Mass Loaded vinyl perform best when it able to move or resonate with the
sound. In other words, when sound hits a MLV membrane, it vibrates the vinyl
which in turn prevents the sound from passing through the vinyl. With that in
mind, it is always best to install mass loaded vinyl directly to bare studs
or joists, that way the MLV is able to resonate with the sound that is trying
to pass through a wall or ceiling assembly.
It is always a good idea to install mass loaded vinyl during the
construction phase of a new home, office or room addition. By installing the
MLV directly to the new structure you are insuring great room to room
soundproofing for the life of your home.
 Most contractors don't think about soundproofing until it is too late and
they are being sued by new owners who are experiencing noise issues in their
new house, condo or co-op.
 The uses for mass loaded vinyl are endless, it has been used to soundproof
homes, and offices as well as automobiles and aircraft. It is also used
extensively to soundproof fences from noisy neighbors or loud traffic noise.
 With new city sound ordinances being enacted almost daily, soundproofing is
becoming a very big issue.
Many people are now living in smaller multifamily units such as condos,
duplexes and apartments where sound can hit you from above, below and all
around you. Soundproofing is becoming an essential part of any new
construction or new renovation project.
 Mass Loaded Vinyl has been an industry standard for over 20 years and it is
one of the best and most economical soundproofing agents on the market today.
 The American mass loaded vinyl is used in many recording studio and home
theater applications to prevent the unwanted sounds from migrating to other
parts of the house or industrial space.
 Again I would like to say that the uses for this material are nearly
endless. Mass loaded vinyl has been used in large concert and theater venues
as well as indoor and outdoor sports areas.
 Many nite clubs and bars have used mass loaded vinyl to keep the noise of
live bands or live DJ's from leaving the club and reaching the ears of nearby
neighbors.
 Mass Loaded vinyl has been used in wood fence construction and has proven to
be quite effective at blocking unwanted neighbor noise as well as loud and
annoying traffic sounds.
  To learn more about this or any of our other Soundproofing or Acoustical treatment products, please feel free to contact one of the Soundproofing
pros at Soundproofing America, Inc, you'll be glad you did. This is Dr.Bob
Adios!

Soundproofing your windows

 
If you are having sound issues in your home, office, or studio, especially
from intrusive outdoor noise, the weak link in the chain is usually your
windows. Standard window glass, even double pane windows actually do very
little to reduce loud outdoor noise from invading your home. Standard window
glass just doesn't have the mass needed to provide adequate soundproofing in
today’s loud and noisy world.
 So what can you do to stop unwanted noise from entering your space? You can
always replace your windows with soundproof windows from manufacturers such
as Mil-gard or Sound Guard, but that can BE a little pricy. There are other
more cost effective ways to soundproof your existing windows.
 There are window inserts which are quite effective at blocking traffic noise
and other irritating noises. A window insert is a made of a window grade acrylic that connects to the frame of your window (generally on a magnetic
track system). The window inserts can add as much as a 32 dB reduction of the
sounds coming through the existing window from the outdoors.  The Climate
Seal Acoustic Series window insert is one such soundproof window insert from Soundproofing
America, Inc.. These inserts are very easy to install and can be done by any
do-it-yourself-er. The Climate Seal window inserts do not open and close, but
they easily detach from their magnetic track in the event that you would want
to open your window. Climate Seal windows are a clear window grade acrylic
that will maintain it's clear view for many years to come. They will provide
up to 30- 32 STC depending on the quality if your existing windows.
 No matter what type of window you are dealing with, sealing the window with
an acoustical caulk can help block out the noise that can be transmitted from
between the glass and the window frame itself. Sealing the window panes is
key to reducing the transmission of sound through any common window.
 The last treatment I would like to discuss is the infamous window plug. Many
times people are willing to sacrifice the light that a window provides in
order to get some soundproofing. That's where the window plug comes in handy.a window plug is made from a closed cell vinyl nitrile foam mat that is
generally at least 2" thick.
 Here's a simple explanation on how to build yourself a window plug. You need
to find a specific closed cell foam mat. One such mat is called America mat.
America mat in the 2" version is perfect for constructing your window plug.
Now let's say that the window you wish to soundproof is 3' X 4' you would cut
the foam to 3' 1" X 4' 1" that way you will have 1/2" around the entire
perimeter of the foam plug that will make the foam plug fit tightly into the
window frame much like a cork in a bottle. Now this extra 1/2" of foam may
need to be trimmed down so that the foam will actually fit tightly into the
window frame. The best way to cut this foam is by using a common electric
kitchen knife much like those used in the late 1970's and early 1980's. They
can still be found at Wal-Mart or K-Mart. The electric knife cuts the foam
leaving a nice smooth almost factory edge on the foam and that makes it
easire to trim down to fit tightly into the window frame.
 Once the foam is cut to fit tightly into the window frame, you will need to
glue the foam to a backing board, something like wood paneling or luaan. The
backing board needs to hold the foam taut so that it will not roll up when it
is placed into the window frame. Placing a couple of kitchen cabinet handles
on the backer board will make for easy installation and removal of the plug.
 One note, it is not recommended that you leave the plug installed in the
window during daylight hours. The sun will heat up the cavity between the
foam and the glass panes and could actually crack the glass. Just keep that
in mind if you decide that the window plugs are right for you.
 The products mentioned are all available online through www.
soundproofingamerica.us
 Thanks for reading about how to soundproof your window This is Bob Orther,
make it a quiet one!

Soundproofing a wood or tile floor

 
 This is a question we get quite often here at Soundproofing America, How do I soundproof a wood or tile floor to stop the transmission of sound to the people below. This is a very common issue in condos, co-op and apartments. Generally with a condo or co-op there are regulations called CC&R’s for which govern the amount of noise that can be transmitted from one floor to another. A very big concern with condo associations is the amount of impact or foot traffic noise which is transmitted through a wood or tile floor and down to the neighbors below.
 In most condo or apartment situations, the upper units have installed carpet and padding. The reason for this is that these materials are soft and absorbent and will stop most the of the harsh foot fall noise that would otherwise transmit through a wood or tile surfaced floor.
 So, what do you do if you live in an upper unit condo or apartment and you want to put in a wood or tile floor? Well I’m glad you asked. There are very effective floor underlayment’s which can be installed directly over top of your clean bare sub floor. Generally these soundproof floor underlay’s are made of high grade recycled rubber (basically recycled car tires) For some scientific reason, recycled rubber is quite effective at blocking unwanted foot fall noises from being transmitted through an normal wood structure floor assembly.
 When looking at a soundproof floor underlay you will need to be concerned about 2 numbers or ratings. The first rating is the STC rating which stands for (Sound Transmission Class) this number refers to the amount of airborne sound that will be transmitted through your floor assembly.  Sounds like TV’s telephones, stereos etc. These noises are much easier to combat than the Impact or foot fall noises that can be transmitted through a floor ceiling assembly.
 The second and more important rating is the IIC rating which stands for (Impact Isolation Coefficient) this number tells you how effective a floor underlay product is a stopping foot fall noise from being transmitted through a floor ceiling assembly. The IIC number is the number that most condo and apartment associations are most concerned about. They want to keep the downstairs neighbors happy.
 Now when looking for a high quality soundproof floor underlay you will need to consider the complete floor ceiling assembly.  In other words what is in your assembly? Is there insulation between the joists? Is the ceiling down below floated on resilient channels or sound clips? Is the ceiling below 5/8” or thicker drywall? All of these factors added up give you the complete picture when you are looking for the highest STC and IIC numbers.
One good example of an effective floor underlayment is our American Impact Standard soundproof floor underlay. This material is a 3/8” thick recycled rubber that comes in rolls that are 4’ wide X 25’ long. It has one of the highest STC and IIC rating of any soundproof floor underlay on the market today. It is the product we recommend most for both efficiency and cost effectiveness.
 Now let’s talk about the installation of the American Impact Standard. First of all we recommend cleaning the bare sub floor thoroughly before beginning the installation application.  Once the floor is cleaned we strongly recommend applying a rubber to sub floor adhesive. One of the best is the DA-5 subfloor adhesive. This product comes in a 5 gallon can and is applied directly to your wood or concrete sub floor using a 3/16” notched trowel. After you have applied the DA-5 adhesive, you will then roll out the American Impact Standard directly over top of the applied adhesive. You want the Impact Standard to cover the floor from wall to wall. If you are able to get this product up under the base boards, that would be great, but if not bring the underlay as close to the baseboard as possible. As you roll the Impact Standard out onto your floor, make sure that you butt all seams together tightly. It is a good idea to lay down a bead of acoustical caulk to the edge of the Impact Standard before you roll out the next roll, this will insure that this product is sealed at the butted seams. The next step would be to caulk around the perimeter of the soundproof floor underlay, this will help to block the airborne sounds from escaping to the floor below and visa versa.
 Hey we’re almost finished. The next step is to lay down your wood or tile floor. One quick note, if your wood floor is a nail down wood floor you will need to glue a backer board directly over top of the Impact Standard so you have something to nail the nails into besides the rubber membrane. If you are putting down a snap together or an engineered wood floor then you can do so directly over top of the Impact Standard underlayment.
 That’s basically the entire procedure for soundproofing a wood or tiles floor. Keep in mind that if you are planning to install a marble floor we do recommend using a backer board to prevent the marble from shifting or cracking. This is simply a recommendation; many of our customers install their marble floors directly over top of the American Impact Standard underlay.
 Take a look at all of our soundproof floor underlay’s such as the Impactless brand for carpet and pad applications as well as the Impact Standard and the Impact Pro recycled rubber underlayment’s.  I hope this has been helpful. Before installing any new floor in an upper floor apartment or a condo, check with your association to see what requirements they have set forth for installing a hard surface floor in an upper unit. This is Dr. Bob, Bye for now.

Soundproofing an upstairs floor using Impactless

 
Let’s talk about soundproofing an upper floor when you are on a budget. Soundproofing any hard surface floor can be time consuming and sometimes expensive, but if you use your head when purchasing floor soundproofing agents you can save a lot of money and time.
 The floor underlayment we will be talking about is called Impactless. Impactless is a lighter weight recycled rubber product that can be sued effectively under carpet and padded floors as well as hardwood and tiles floors. To get the same results as the more costly underlay’s there are some rules that need to be adhered to carefully. For a carpet and pad installation you would simply place the Impactless floor underlay directly atop of a thoroughly cleaned wood or concrete sub floor. It is a good idea to glue this material to the floor using a common sub floor adhesive that can be found at any Home Depot or Lowe’s.
 It is not essential to glue this material to the sub floor but gluing it does help with the soundproofing characteristics of this material. Now there are 2 sides of the Impactless underlayment product, 1 side is a rubber faced side and that other is a white scrim faced side. When installing carpet and pad, you want the white scrims facing to face upwards. The scrim face gives you a smooth surface in which to glue the carpet pad directly to the Impactless material.
 After you have rolled out the Impactless floor underlay, you would then caulk all of the seams as well as the perimeter of the rubber membrane with an acoustical caulk that you will purchase with your Impactless package. The acoustical caulk seals the membrane at the seams as well as sealing the outer perimeter of the membrane.  After the Impactless is sealed you will spot glue the carper padding directly to the white scrim facing if the Impactless.
 We’re almost done now! The last step is to nail down the new carpet tack strips (nail board that the carpet stretches too) right through the padding and the Impactless and directly into the sub floor. Once the tack stripe and nailed into place simply install the new carpet, stretching it tightly to the tack strips. That’s it, you have just installed an economically and very effective soundproof flooring assembly. For more tips on how to soundproof a floor, call the professional at Soundproofing America, they’re here to help. This is Dr. Bob, Adios.


Commercial and Industrial Soundproofing


Commercial and industrial soundproofing offers a unique set of challenges. As a
general rule the areas to be soundproofed are larger and more open. For example, if you are soundproofing a metal crushing machine in a factory setting, you need to deal with the high ceilings and open spaces. If you plan to construct an enclosure around the machine, many times that enclosure will
be free standing on at least 2 legs. Also you will want to construct walls
that are a minimum of 8' tall, the higher the walls of the enclosure the
better the soundproofing will be. The enclosure will need a gateway or a door
where workers will be able to work with the machine as well as maintain it.
 If the machine is in a corner, that makes building the enclosure much easier
because you would only need to construct 2 soundproof walls for an enclosure.
 It is always best to construct an enclosure much the same as building a room
around the machine. In other words using metal studs and constructing  solid
walls that will contain soundproofing agents such as American mass loaded
vinyl or the America Mat closed cell foam ma, maybe a combination of both
materials.
 The mass loaded vinyl (MLV for short would be screwed to the stud structure
using self taping drywall screws with washers on them. It is recommended that
the MLV be installed horizontally across the studs and that the seams be over
lapped by at least 1 inch. You will need to caulk all of the seams as well as
the over lap and around the entire perimeter of the vinyl membrane.
 Once the MLV is installed and sealed with the caulk, you have the option of gluing a layer of the 1/2" or the 1" closed cell foam mat directly to the
back of the MLV membrane.
 Now the America mat will help, but is not essential to obtain good soundproofing from this system. Once the MLV and the closed cell foam are installed onto the stud framework
it is time to drywall both sides of the wall assembly. I would recommend using 5/8" drywall on both sides of the wall to add additional mass and
therefore additional soundproofing to the enclosure.
Finally, when you install your door, you will want to install a solid core door which will help to block the noise from escaping through the door.
Well that's about it for soundproofing machinery in an Industrial
application. I will be writing more on other commercial soundproofing
projects in later articles. This is Dr. Bob...Adios!